
Introduction
A well-finished garage floor does more than just look good—it enhances durability, simplifies cleaning, and increases the value of your home. Epoxy flooring is one of the best solutions for a high-performance, long-lasting surface that resists stains, chemicals, and wear. However, achieving a professional finish requires careful preparation and the right techniques.
This guide will walk you through everything you need to know about DIY epoxy flooring, from understanding the different types of epoxy to applying the coating correctly and maintaining your floor for years to come.
What is Epoxy Flooring?
Understanding Epoxy Coating
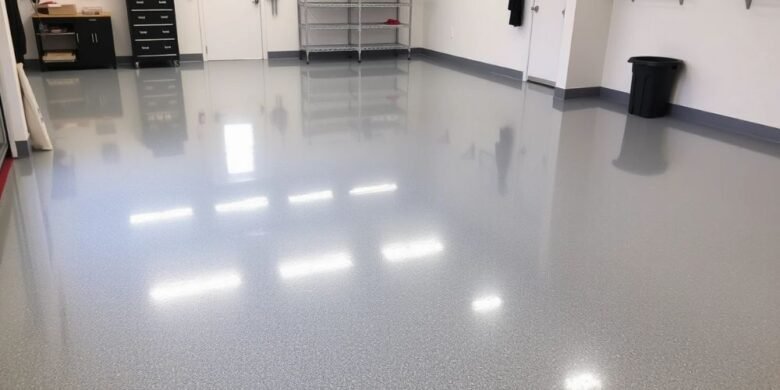
Epoxy flooring is a type of surface coating made by combining resin and a hardening agent. When mixed, these components create a chemical reaction that forms a tough, durable, and seamless surface. Epoxy is widely used in garages, industrial spaces, and commercial buildings due to its high resistance to wear and tear.
Types of Epoxy Coatings
When choosing an epoxy coating for your garage, it’s essential to understand the different options available:
| Type of Epoxy | Characteristics | Best Use Cases |
|---|---|---|
| Water-Based Epoxy | Easy to apply, less durable | Light-use garages, home workshops |
| Solvent-Based Epoxy | Stronger but emits fumes | Heavy-duty use, industrial spaces |
| 100% Solids Epoxy | Most durable, thick coating | High-traffic areas, commercial garages |
| Metallic Epoxy | Unique, glossy finish | Showrooms, luxury garages |
| Self-Leveling Epoxy | Smooth surface, covers imperfections | Cracked or uneven floors |
Each type has its benefits, but for most DIY garage flooring projects, water-based or 100% solids epoxy is recommended due to their ease of application and durability.
Benefits of Epoxy Flooring
Why should you choose epoxy over other garage flooring options like tiles, concrete paint, or rubber mats? Here are some of the key benefits:
1. High Durability
Epoxy is highly resistant to impact, chemicals, and stains. It can handle heavy machinery, vehicles, and tools without cracking.
2. Easy Maintenance
Unlike porous concrete, epoxy does not absorb oil, dirt, or water, making it easy to clean with just a mop and mild detergent.
3. Chemical and Stain Resistance
Epoxy coatings protect against automotive fluids, chemicals, and even salt from winter roads.
4. Aesthetic Appeal
With various finishes available—solid colors, metallic effects, or decorative flakes—epoxy can enhance the overall look of your garage.
5. Cost-Effectiveness
Compared to tiles or polished concrete, epoxy is relatively affordable and provides long-term savings due to its longevity and low maintenance.
Tools and Materials Needed
Before you start your DIY epoxy project, gather the essential tools and materials:
Tools Required
- Paint rollers (long handle for even application)
- Squeegee or notched trowel
- Drill with mixing attachment
- Heavy-duty broom and vacuum
- Painter’s tape
- Rubber gloves, safety glasses, and a respirator
- Bucket for mixing epoxy
- Concrete patching compound
Materials Needed
- Epoxy resin and hardener
- Concrete degreaser or cleaner
- Etching solution or grinding tool
- Decorative flakes (optional)
- Primer coat
- Clear topcoat for extra durability
Preparing Your Garage Floor
One of the biggest mistakes in DIY epoxy flooring is skipping proper surface preparation. A poorly prepared floor can lead to peeling, bubbling, or an uneven finish.
Step 1: Cleaning the Floor
- Sweep and vacuum all dirt and debris.
- Remove oil stains using a concrete degreaser.
- Scrape off any old paint or coatings.
Step 2: Checking for Moisture
Moisture can cause epoxy to fail. To check for excess moisture, tape a plastic sheet to the floor and leave it for 24 hours. If condensation forms underneath, your floor may need a moisture barrier before epoxy application.
Step 3: Repairing Cracks and Holes
- Fill any cracks or holes using a concrete patching compound.
- Let the patch dry completely before sanding it smooth.
Step 4: Etching or Grinding the Surface
For epoxy to bond properly, the concrete must be roughened:
- Acid Etching: Apply an etching solution and scrub with a stiff brush.
- Diamond Grinding: A professional-grade grinding tool creates a more even surface.
Applying the Epoxy Coating (Step-by-Step)
Once your floor is fully prepped, it’s time to apply the epoxy. Proper application is crucial for a smooth, long-lasting finish.
Step 1: Priming the Floor
- A primer improves adhesion and helps the epoxy bond to the concrete.
- Use a roller to spread a thin layer of primer evenly.
- Let it dry for at least 6-8 hours.
Step 2: Mixing the Epoxy
- Follow the manufacturer’s instructions to mix the resin and hardener.
- Stir thoroughly for 3-5 minutes to ensure an even mixture.
Step 3: Applying the Base Coat
- Pour the mixed epoxy in a line across the floor.
- Use a roller or squeegee to spread it evenly.
- Work in sections to avoid overlap lines.
Adding Decorative Finishes
For those who want a more visually appealing garage floor, adding decorative elements can enhance the epoxy coating. The most popular options include colored flakes and metallic epoxy.
Step 4: Broadcasting Decorative Flakes
Decorative flakes add texture and improve slip resistance. Here’s how to apply them:
- While the base coat is still wet, lightly sprinkle the flakes across the surface.
- For a uniform look, apply the flakes by throwing them upward and letting them fall naturally.
- Allow the epoxy to cure according to the manufacturer’s recommended drying time.
- Once the floor is dry, use a broom or vacuum to remove any loose flakes before applying the topcoat.
Step 5: Applying a Metallic Epoxy Finish (Optional)
Metallic epoxy creates a luxurious, high-gloss effect with swirling patterns. This is done by:
- Mixing metallic pigments into the epoxy.
- Pouring the epoxy in random patterns.
- Using a roller or brush to create desired movement and effects.
Sealing with a Protective Topcoat
Applying a clear topcoat is essential for durability and longevity. This additional layer protects the epoxy from scratches, stains, and wear.
Step 6: Mixing and Applying the Topcoat
- Choose a polyurethane or epoxy-based topcoat for best results.
- Mix the topcoat components thoroughly.
- Use a roller to apply a thin, even coat over the entire surface.
- Allow at least 24 hours for curing before light foot traffic.
- Full curing (for vehicles) may take up to 7 days.
Common Mistakes and How to Avoid Them
Even with careful preparation, DIYers often encounter issues. Here are some common mistakes and how to avoid them:
| Mistake | Cause | Solution |
|---|---|---|
| Peeling or Bubbling | Poor surface preparation, trapped moisture | Properly etch/grind the surface and check for moisture before applying epoxy. |
| Uneven Coating | Overworking the epoxy, applying too much at once | Spread the epoxy in sections and avoid over-rolling. |
| Sticky or Soft Spots | Incorrect mixing ratio or humidity issues | Follow exact mixing instructions and apply epoxy in controlled conditions. |
| Yellowing or Fading | UV exposure | Use a UV-resistant topcoat for protection. |
| Air Bubbles | Improper mixing or application | Stir slowly to prevent air bubbles and use a heat gun to remove any that appear. |
Maintaining Your Epoxy Garage Floor
To extend the life of your epoxy floor, follow these maintenance tips:
1. Regular Cleaning
- Sweep or dust mop regularly to remove debris.
- Use mild soap and water for cleaning—avoid harsh chemicals.
2. Avoid Heavy Abrasion
- Place mats under car tires to prevent hot tire pickup.
- Use soft-bristle brushes for scrubbing.
3. Repair Damage Promptly
- Fill any chips or cracks with an epoxy repair kit.
- Reapply topcoat every few years to maintain shine.
Final Thoughts
Installing epoxy flooring in your garage is a rewarding DIY project that adds durability, aesthetics, and functionality to your space. With proper surface preparation, careful application, and regular maintenance, your epoxy floor can last 10–15 years or more.
By following this step-by-step guide, you’ll achieve a professional finish without the cost of hiring contractors. Whether you prefer a sleek, solid-color floor or a high-gloss metallic effect, epoxy is a fantastic choice for enhancing your garage.
Thinking of installing epoxy flooring? Share your experience or questions in the comments below!
Reviewed and updated on 01/24/2025