
The garage is often one of the most neglected spaces in a home—an area where tools, sports equipment, and boxes of forgotten items pile up over time. But with a little effort and organization, you can transform your messy garage into a clean, functional, and organized space that works for you.
In this guide, we’ll break down the process into 5 actionable steps to help you declutter your garage, reclaim valuable space, and enjoy a more efficient and stress-free environment.
The Challenges of a Cluttered Garage
A messy garage comes with several challenges that can interfere with its function:
- Limited Space: There’s no room for cars, hobbies, or projects when clutter takes over.
- Difficulty Finding Items: Searching for tools, equipment, or seasonal items becomes frustrating and time-consuming.
- Safety Risks: Piles of items can lead to accidents, like tripping over loose objects or toppling heavy boxes.
- Mental Stress: A disorganized space creates visual chaos, making it harder to focus and feel relaxed.
The good news? By following these steps, you can eliminate these problems and enjoy a clutter-free garage.
Step 1: Empty and Sort Everything
The first step to decluttering is to start fresh.
- Take Everything Out: Remove all items from your garage. This may seem overwhelming, but it gives you a clear view of what you have and how much space you’re working with.
- Sort into Categories: Separate all items into the following groups:
- Keep: Tools, equipment, or items you use regularly.
- Donate/Sell: Items in good condition that you no longer need.
- Trash: Broken, expired, or unusable items.
- Be Honest: Ask yourself these questions to decide what stays:
- “Have I used this in the past year?”
- “Does it add value or serve a purpose?”
- “Would someone else benefit from this more than I would?”
Tip: For items with sentimental value, consider taking a photo before letting them go.
Once sorted, remove anything you’re donating or trashing right away to avoid second-guessing your decisions.
Step 2: Deep Clean the Space
With your garage emptied, it’s time to give it a thorough cleaning:
- Sweep and Vacuum: Remove dust, cobwebs, and debris from the floor, corners, and shelves.
- Wash the Floors: Use a power washer or scrub brush with soap and water to clean oil stains or spills.
- Wipe Surfaces: Clean walls, shelves, and garage doors with a damp cloth or mild cleaning solution.
- Fix Small Repairs: Patch up cracks, repaint walls, and replace any broken lights or fixtures.
Bonus Tip: Add an anti-fatigue mat near workbenches or high-traffic areas for comfort and cleanliness.
A clean slate makes it easier to visualize your ideal garage layout.
Step 3: Plan and Divide Your Garage into Zones
To maintain order and functionality, divide your garage into specific zones based on how you use the space.
Here are some suggested zones:
- Tools and DIY Projects: Designate a wall or corner for tools, workbenches, and hardware. Use pegboards and shelves for easy access.
- Sports Equipment: Install hooks or racks for bikes, balls, and outdoor gear.
- Seasonal Storage: Use labeled bins to store holiday decorations, camping gear, or winter items.
- Gardening and Lawn Care: Dedicate a space for shovels, rakes, and lawnmowers. Hang tools vertically to save floor space.
- Automotive Supplies: Create a shelf or cabinet for car maintenance items like oils, fluids, and cleaning supplies.
Visualize Your Layout: Use a piece of paper to sketch a simple plan for your garage zones. This ensures every item has a designated home.
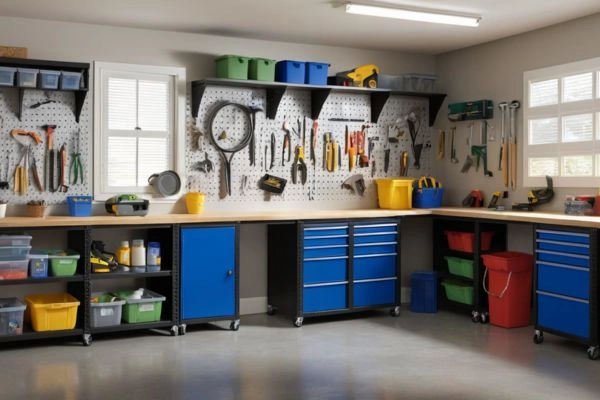
Step 4: Install Smart Storage Solutions
The secret to an organized garage is maximizing every inch of available space with smart storage systems.
Vertical Wall Storage
- Pegboards: Hang tools, cords, and supplies neatly on a customizable pegboard.
- Wall Shelves: Use sturdy wall-mounted shelves for boxes, bins, and frequently used items.
- Hooks and Racks: Install hooks to hang bikes, ladders, and garden tools vertically.
Ceiling Storage
- Utilize the ceiling for overhead racks to store seasonal or rarely used items. This keeps the floor free for vehicles or projects.
Modular Storage Cabinets
- Add lockable cabinets or rolling storage units to organize hazardous chemicals or expensive tools.
Clear Bins and Labels
- Use transparent storage bins so you can see the contents at a glance. Label each bin for easy identification.
Tip: Group similar items together (e.g., all screws in one bin, all camping gear in another) for a streamlined setup.
Step 5: Return Items Strategically and Maintain Order
Now that your garage is clean and organized, it’s time to return everything to its new home:
Prioritize Accessibility:
-
- Place items you use regularly in easy-to-reach areas.
- Store seasonal or rarely used items on higher shelves or ceiling racks.
Maintain Zones: Keep similar items together in their designated zones.
Stay Organized:
-
- Schedule a quick cleanup every month to prevent clutter from building up.
- Regularly donate or discard items you no longer need.
Pro Tip: Label shelves, bins, and zones so everyone in your household knows where things belong.
Common Mistakes to Avoid When Decluttering
- Holding Onto Too Much: Be realistic about what you need and use. Sentimentality can lead to unnecessary clutter.
- Skipping the Sorting Process: Don’t try to organize items without first decluttering.
- Neglecting Storage Solutions: Without proper shelves, hooks, or bins, clutter will quickly return.
- Not Setting Rules for the Future: Create a system to manage what comes into your garage moving forward.
The Benefits of a Decluttered Garage
Once your garage has been decluttered and organized, you’ll enjoy:
- More Space: Room for vehicles, hobbies, or a functional workspace.
- Time Savings: Easily find what you need without digging through piles of stuff.
- Reduced Stress: A clean, organized space feels calmer and more manageable.
- Improved Safety: Fewer hazards and better access to tools and equipment.
Conclusion
Decluttering your garage doesn’t have to be overwhelming. By following these 5 simple steps—emptying, cleaning, planning zones, installing storage solutions, and maintaining order—you can turn your messy garage into a clean, organized, and functional space.
Take the first step today, and experience the satisfaction of a clutter-free garage that works for you and your family. A little effort now will make a huge difference in how you use and enjoy your space for years to come.
Reviewed and updated on 01/24/2025